Home Site Map - Techniques - Structure -
Carnation Walling - Inner Plywood
![]() Add the two layers of plywood on the inside of the wall to form that
side of the concrete.
Add the two layers of plywood on the inside of the wall to form that
side of the concrete.
Wood shims
Make and add wooden spacers on the inside of the wall under where the plywood will be. The wood spacers are 2-1/8" wide and butt up to the nailed down kicker planks. They are between the spacers used for the studs to make a continuous fill for the length of the wall. Where an inner vertical baton is not yet fitted, the filler strip can be continuous. Use the inner markings on the slab at the tie rod positions to determine the shim thickness required. Glue the wood spacers to the concrete with PL-Premium adhesive. They do not need to be removed after the wall concrete pour because the wainscoting will hide them. Fill with glue the gaps between the shims.
You don't want any shims under where the cavity concrete will be because you want the wall concrete to fully contact the slab concrete. No EPS shims and no wood shims in the cavity.
Fit plywood and inner vertical batons
A nice thing about not adding the plywood until the last step is that it avoids it getting wet from rain.
Cut thin plywood
The dimensions come from the elevation CAD drawing. You need to cut for the window and door openings.
Make jigs for thin plywood
The sizes are as per the CAD drawings.
Even though the thin plywood equates to the 6" EPS, it is necessary to use different jigs because the corner lengths are different. Drill with 3/8" holes but you may need to increase the hole size slightly with a hand held drill or rat-tail rasp as you add the sheets to get them to go on.
The jigs are each made from a lattice of 2x4s are used to provide a template for drilling the holes.
The bottom left of the jig exactly lines up over the 8'x4' thin plywood sheet. The bottom left is the reference. Bits of L shaped 2x4s hang over the edge at the bottom and left and are used to accurately position the plywood template over the plywood sheet.
Cut the openings for the windows and doors.
Only drill the X'9" holes for the primary vertical batons and for the corner 2x6 verticals. Only drill X-3" holes where needed for wall openings.
The jigs (and sheet cut sizes) required are...
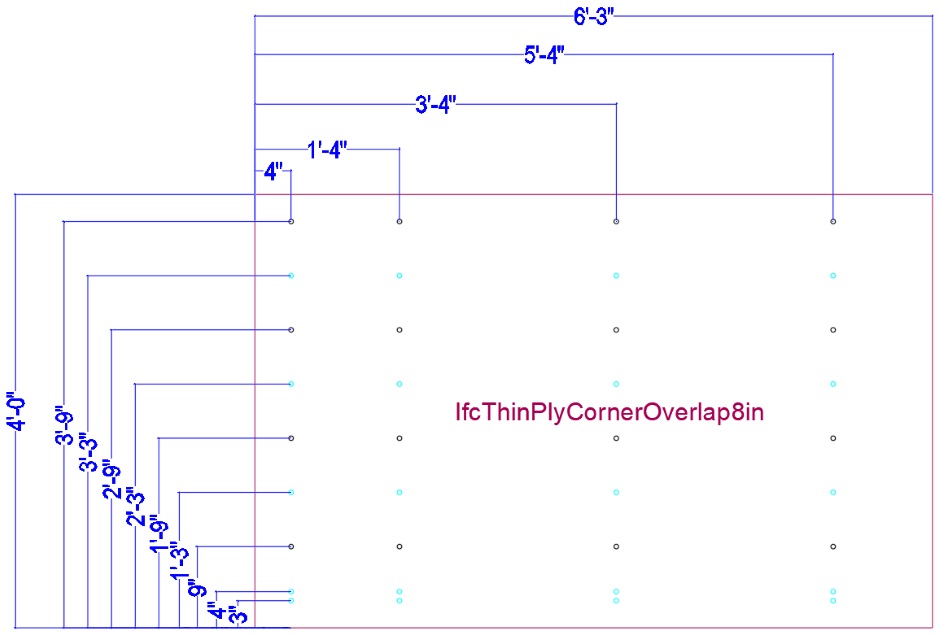
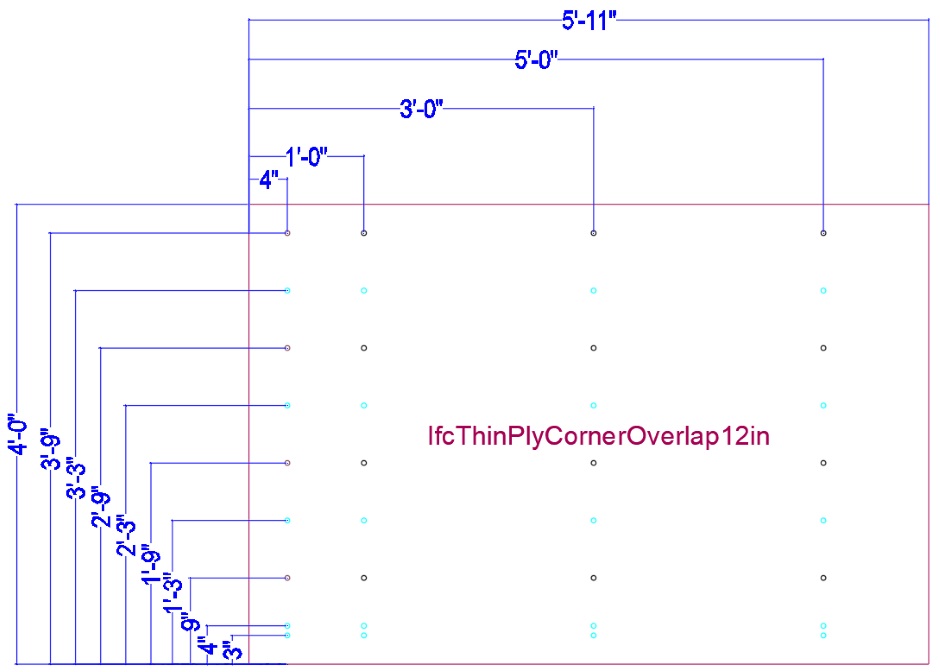
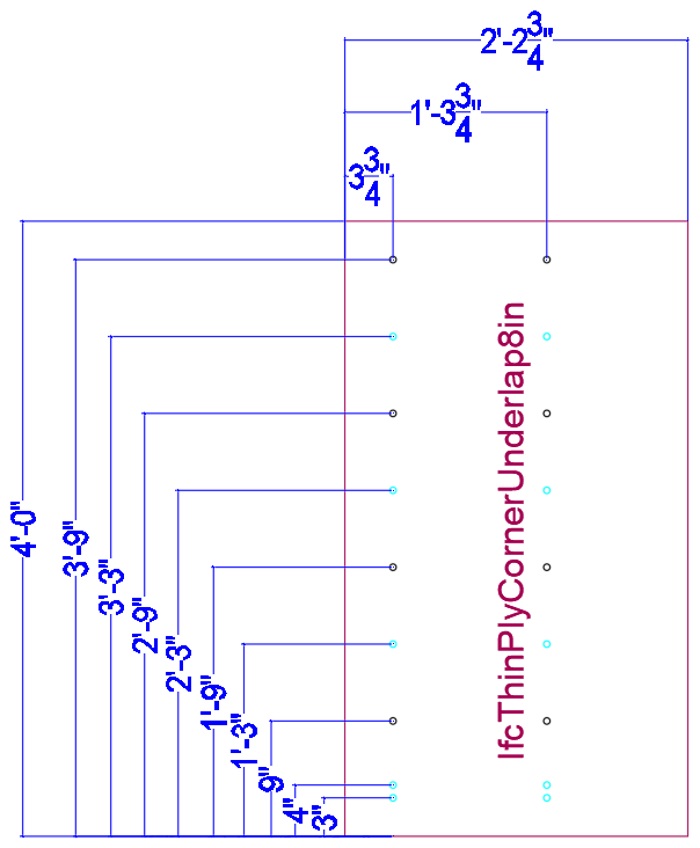
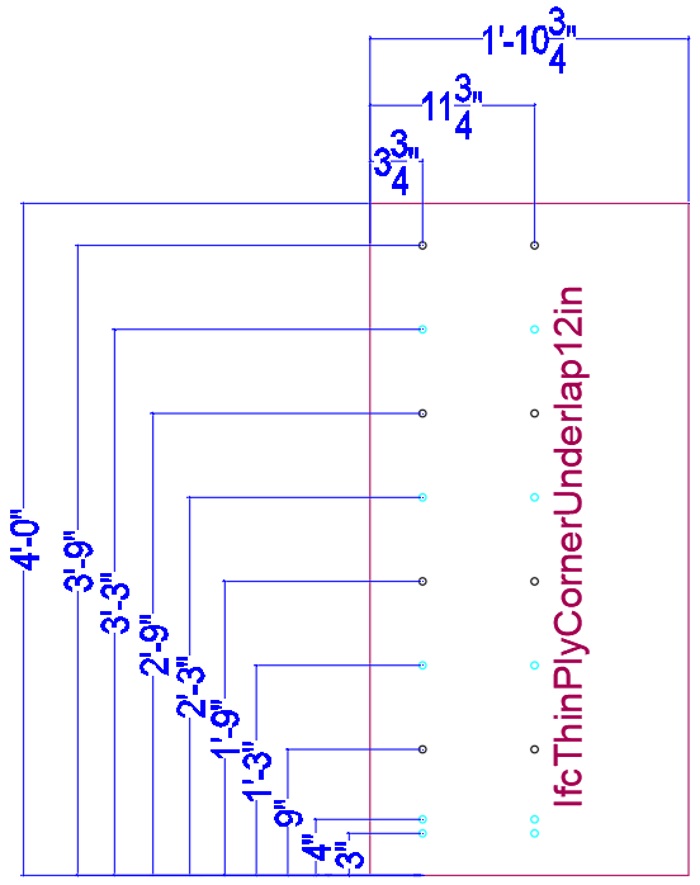
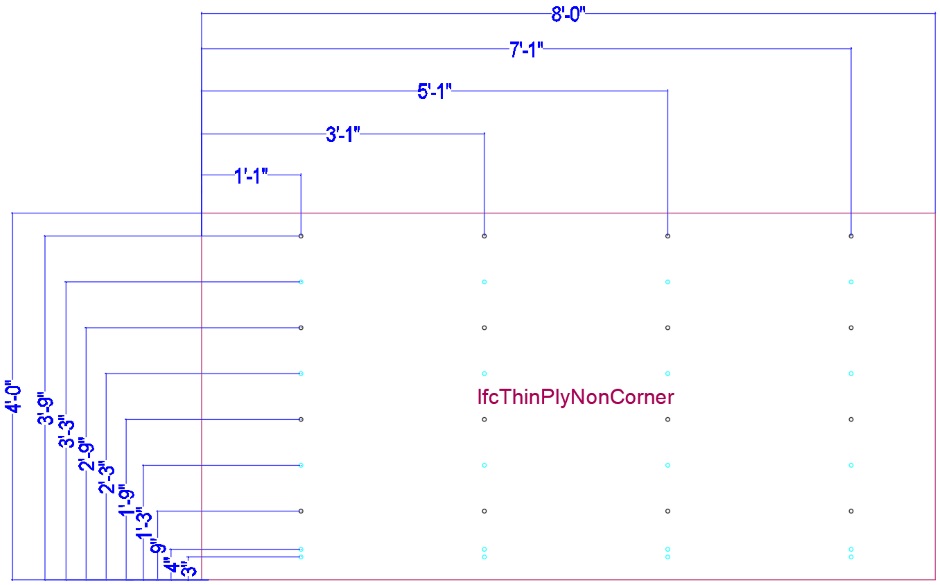
For a sheet that rests on the slab, the wall tie hole distances from the bottom of the sheet will usually be... 4", 9", 1'9", 2'9", 3'9" . To drill the 4" row of holes use the row of holes at the bottom of the jig (light blue). For other sheets up the wall, the wall tie hole distances from the bottom of the sheet will be... 9", 1'9", 2'9", 3'9".
For the corner pieces the first column of wall tie holes are 3-3/4" from the edge for an under-lap piece and 4" for an over-lap piece.
For non-corner pieces the first column of wall tie holes are 1'1" from the edge and then every 2 foot after that.
For 12" cavity corner pieces the first column of holes is shifted by 4".
The X'3" holes are also provided but are typically covered in tape. They are only used above and below window openings (and at the bottom of sheets that go directly on the slab).
Cut thin plywood
The dimensions come from the elevation CAD drawing. You need to also cut for the window and door openings.
Drill thin plywood
Use a Kreg 3/8" drill, then increase the size to 7/16 with another drill bit.
Make jigs for thick plywood
Jigs, each made from a lattice of 2x4s, are used to provide a template for drilling the holes.
The jig exactly lines up over the 8'x4' thick plywood sheet. The bottom left is the reference. Bits of 2x4 hang over the edge at the bottom and left and are used to accurately position the plywood template over the thick plywood sheet.
Not all the sheets need jigs because not all the sheets have holes. The 2' high sheets can use the same jigs as the 4' high version.
The jigs (and cut sheet sizes) required are...

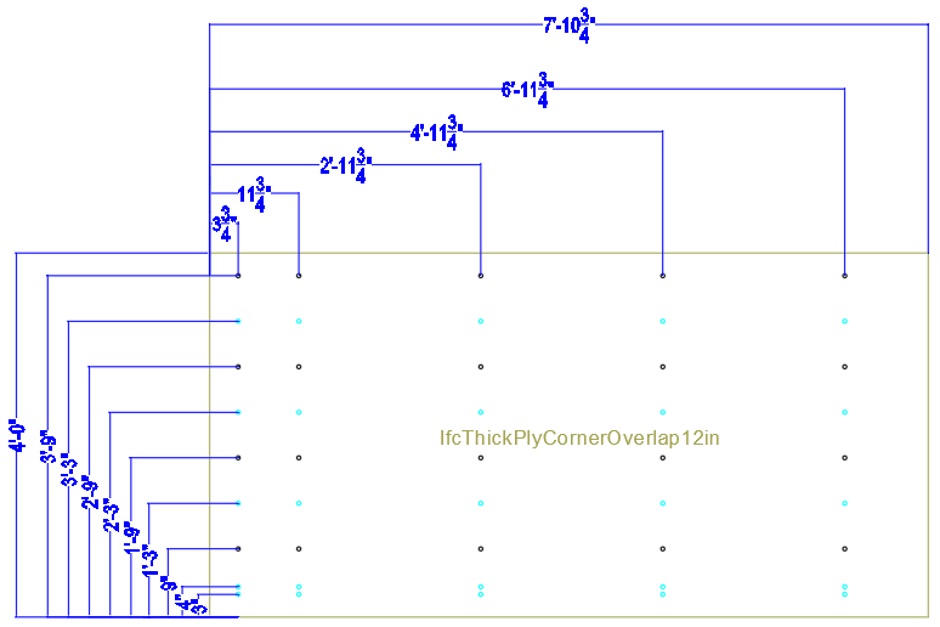
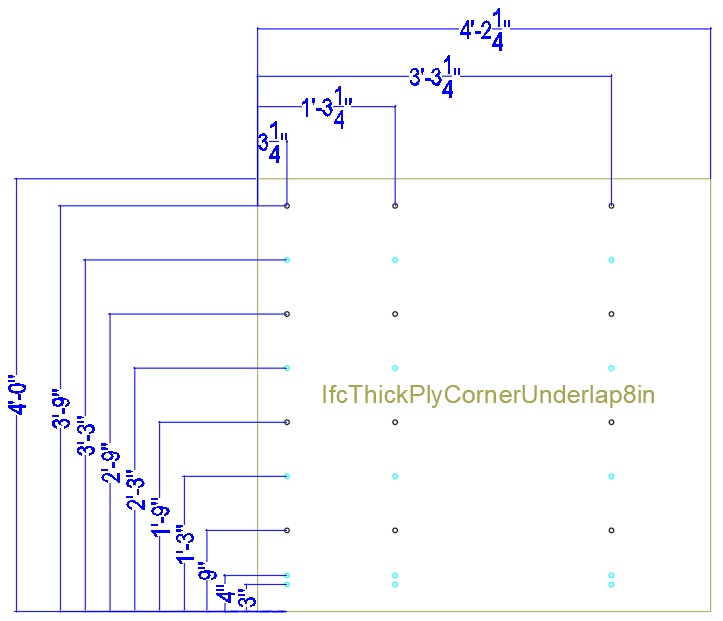
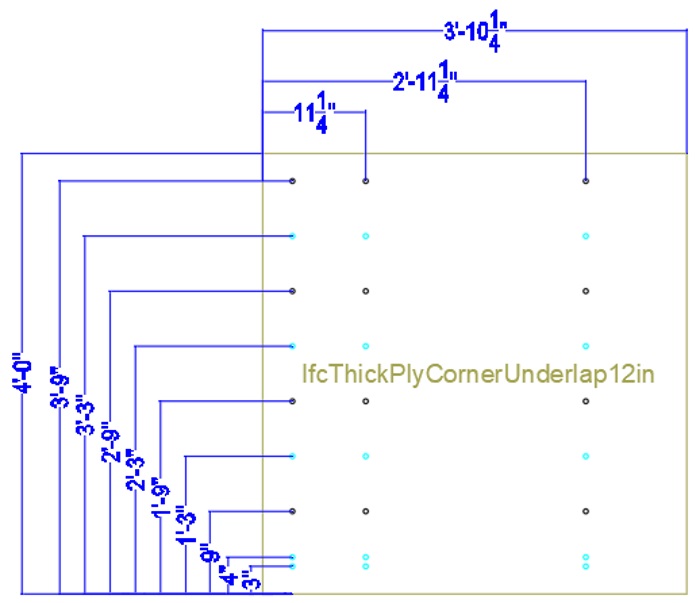
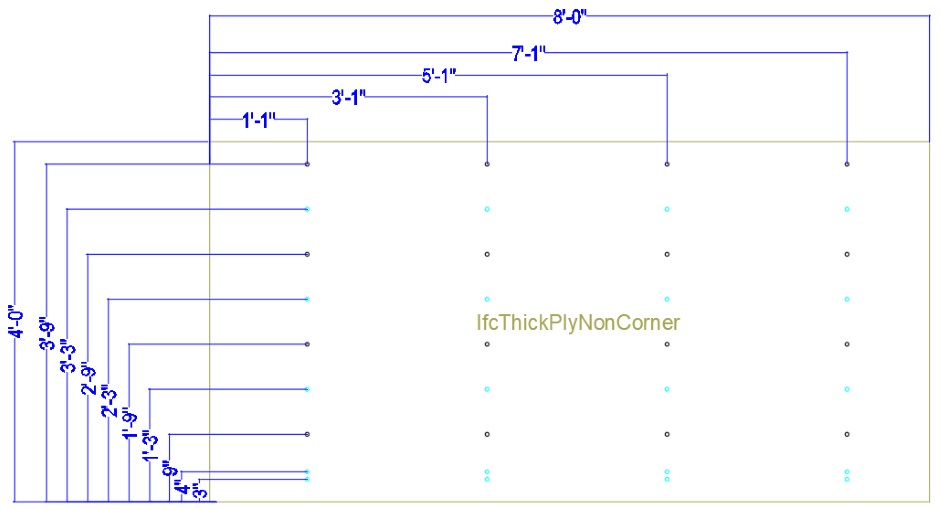
For a (2 foot high) sheet that rests on the slab, the hole distances from the bottom of the sheet will be...
4", 9", 1'9". Use the bottom row of holes (light
blue) for drilling the 4" above bottom holes.
For other sheets (4 foot high) up the wall, the hole distances from the bottom of
the sheet will be...
9", 1'9", 2'9", 3'9"
The X'3" positions are provided but are typically covered with tape. They are just used above and below windows and doors.
Cut and drill thick plywood
Do the cutout for the windows and doors.
Use a 3/8" drill, then increase the size to 7/16 with another drill bit
Pull back threaded rods
Some of the more strategic internal vertical batons were fitted in their final position. Typically you can leave the vertical batons in place and just pull back the threaded rods. Given that the conduit pipes are thoroughly tied together with 65lb cable ties the wall ties should stay in their right locations.
Install thin plywood
Fitting the plywood with all the wall ties going through the holes is a bit fiddly. The ties should be in about the right locations, but you may need to use a grabber tool or a stick with a hook cut in the end to get them in the hole. You can push the ties outwards in the wall and then pull them back one at a time to get them through the hole.
Remote grabber tool
Install thick plywood
Fitting this over the wall ties is a little easier because the thin plywood is already holding the ties in the correct positions.
Fit rest of the vertical 2x4 batons
The full set of internal vertical batons can now be fitted in their final locations. As before use the appropriate thickness shim under the vertical batons. Screw from the kicker boards into the bottom of the vertical 2x4 batons using two 3" screws.
Install all the horizontal bracing onto the ends of the appropriate threaded rod wall ties. The horizontals are needed on both the inside and the outside of the wall. Note that horizontals are not just for setting the distance between vertical batons. They also allow extra padding pieces to be added for additional bracing of the EPS and plywood.
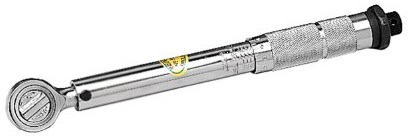
Add steel washers and steel 3/8" nuts and do them up using a torque wrench set to a torque of XXX. Using the same torque for each wall tie rod aims to avoid the tubes and washers sinking into the EPS different amounts that could cause the wall to be wavy.
Torque wrench
Drill holes for internal window shutters
These are threaded 1/2" rod with nuts and washers. The ones for the shutters go through both sheets of plywood.


It is rare for you to want internal shutters (perhaps never), but it is worth having bolts available just in case you ever need to fit security shutters to leave the house unoccupied for a long period of time. Security shutters are a single piece of steel sheet fitted right across the full window width.
Strengthen the Carnation Flooring ceiling
The act of adding all the vertical 2x4 batons in their correct positions will strengthen the lattice of beams that support the floor above. It should then be possible to walk on the floor and this is in fact necessary when pouring the concrete.
Add additional bracing and fillers
This is all about thinking where the most wet concrete pressure will be exerted and making sure everything is properly braced to withstand that pressure.
Horizontals at the bottom
Fit horizontal bracing at the bottom of the walls using the 4" from the bottom holes.
Spacers between horizontal batons and plywood
This is particularly needed for the horizontal bracing that sits on the kicker boards.
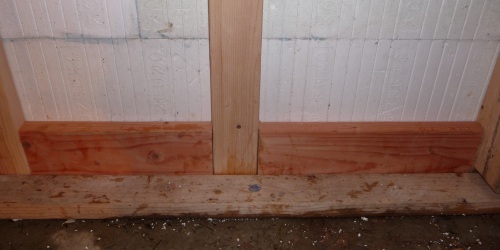
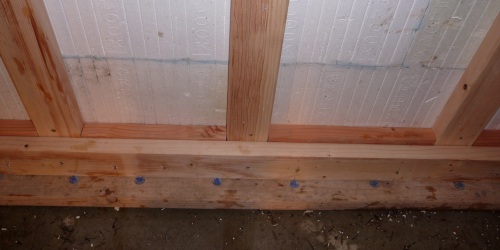
Spacers of 2x4 or 2x6 are used on the inside to fill that gap where there is no vertical bracing. They go up against the kicker plank. Typically the spacer bits are 1'8-7/16" long. The spacer pieces will fit between the vertical bracing pieces that are every 24". Near the window openings, different length spacer pieces will be needed to place vertical bracing either side of the window opening. The spacer pieces do not need to be nailed down. The spacers will extend 5.5" up the wall, ie will stand on edge.
External corner bracing
This is horizontal bracing and has filler 2x6 pieces between it and the EPS.
Bracing around windows
On each side of a window (or door) opening it is necessary to have bracing. The cut EPS will be weak in this area so needs good bracing. The bracing also is used to help support the weight of the window bucking.


